

Build A Thunderbolt Hackintosh For Audio
In this article I explain the process of building a hackintosh computer with stable plug and play Thunderbolt for use with UAD Apollo and other Thuderbolt based interfaces.
As this is a really confusing topic with the information spread out all over the internet I thought I’d make a guide for how to create the Ultimate Audio hackintosh for use with Apollo and other thunderbolt audio interfaces.
It’s an easy to follow “How to” for making a stable plug and play computer that behaves just like a Mac where Thunderbolt and iCloud work right out of the gate.
However, my main advice to you is DO NOT do this. You dont need a mega powerful computer for audio production and a used M1 Mac mini with 16 Gig of ram will be completely adequate.
But, if you want to use PCI cards, be able to upgrade your storage and Ram and like the process of building, giving yourself a major headache and troubleshooting for hours on end then this is defiantly something for you! I had problems with my motherboard, my ram and my graphics card so I literally spent weeks on this!
But if you’re not on your way the Apple store right now and you’re still with me, read on!


Download OSX
Make sure you have at least 40GB available on your current OS’s HDD or it will fail!
Paste the following into Terminal and choose the OS version you want to download -
mkdir -p ~/macOS-installer && cd ~/macOS-installer && curl https://raw.githubusercontent.com/munki/macadmin-scripts/main/installinstallmacos.py > installinstallmacos.py && sudo python installinstallmacos.py
Now wait! Its not done when you think it is! After the lines of stars it will start to pack the dmg installer ready for use.
When it’s finished click on your HDD/Users/“your user name”/macOS-installer/Install_macOS_11.6.1-20G224.dmg
Mount the DMG file and drag the installer file inside it to your applications folder
USB prep
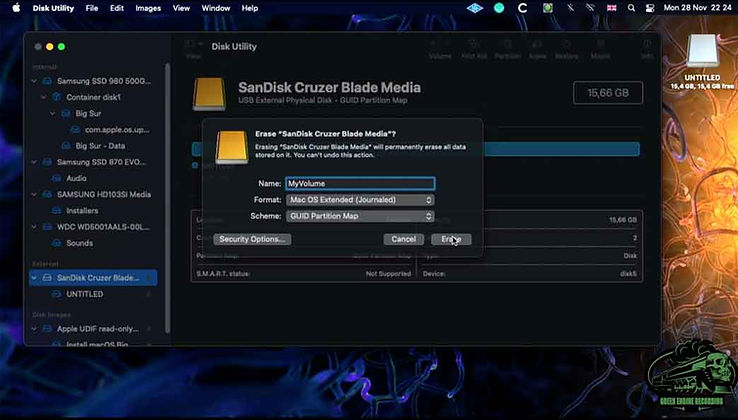
Open Disk utility
Under view choose “show all devices”
Name - MyVolume
Format USB stick as Mac OS Extended (journaled)
Scheme - GUID Partition Map
Run The Create install media command in Terminal -
sudo /Applications/Install\ macOS\ Big\ Sur.app/Contents/Resources/createinstallmedia --volume /Volumes/MyVolume
Create the EFI:
Open Hackintool, go to the “Disks” tab, find your USB disk and click the up/down arrows in the 6th column.
Now replace the EFI folder on the USB stick with the prebuilt one you downloaded from SchmockLord.
Open the prebuilt EFI folder you just replaced.
Within the “OC” folder there are 3 config files. Choose which one you want to use and rename it to just “config.plist” (I recommend using config_iMac20,2_iGPU display output if you have a CPU that supports onboard graphics and just setting up the external GPU later if you have one this will also let you use 3 screens) right click it and open it with “Open Core Configurator”
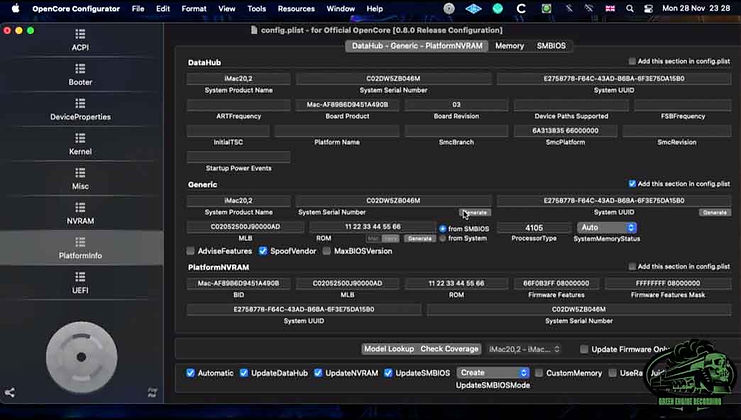
Go to “PlatformInfo” on the left
Click the “DataHub - Generic - PlatformNVRAM” tab
Choose iMac20,2 from the dropdown menu at the bottom
Below (not next to) System Serial number click the little “Generate” button
Save the config and quit OCC
Make a copy of the EFI folder on the USB stick

Bios Configuration
Startup the system and press the Delete” key after the Gigabyte logo to enter the BIOS
Check the Bios is F20 under the “Information” tab. If not upgrade it by downloading it from Gigabyte’s website. Don’t go higher than F20 as there is no way back! If you need to do this, after putting the downloaded file on a USB stick use the Qflash function “F8” in the bios.
Press “F2” to get to the advanced menu. Load the “optimised defaults” then change the following:
Settings/IO Ports/Internal Graphics > Enabled
Settings/IO Ports/Wake on LAN Enable > Disabled
Settings/IO Ports/Thunderbolt(TM) Configuration/Wake from Thunderbolt devices > Disabled
Settings/IO Ports/Thunderbolt(TM) Configuration/Security Level > No Security
Settings/IO Ports/Thunderbolt(TM) Configuration/Dicrete Thunderbolt(TM) Confuguration/GPIO force power > Enabled
Settings/IO Ports/USB Configuration/Legacy USB Support > Disbled
Boot/Secure Boot//Secure Boot Enable > Disabled

Installation
Insert the USB flash disk into one of the Red USB 3.2 ports by the Thunderbolt ports on the rear IO panel of the Designare z490
-
Start the computer with the USB flash disk already inserted.
-
After the Gigabyte splash screen The OpenCore Boot Picker will appear.
-
Choose the option Install MacOS.
-
-
MacOS installer will take a few moments to load and run. If successful, it will ask for a language preference and present a set of options, one of which will be Disk Utility.
-
Run Disk Utility and select View --> Show All Devices.
-
Select the parent or top-level name of the macOS internal SSD and select Erase.
-
Three fields should appear, and the following entries should be made:
-
Name: Big Sur (this can be changed any time after installation is completed)
-
Format: APFS
-
Scheme: GUID Partition Map
-
-
Double-check selections and settings, then click Erase to format the internal macOS SSD.
-
Then quit from Disk Utility.
-
-
Now select the option to begin macOS installation.
-
Accept the license terms.
-
Select the just-formatted internal macOS SSD as the target location.
-
-
This begins Phase 1.
-
The system can reboot suddenly once or twice.
-
At the OpenCore boot picker there should be a new entry called simply MacOS Installer.
-
Select MacOS Installer from the OpenCore boot picker. However, it should already be selected. It will reboot several times before it manages the install, but just leave it to it and have a coffee. It will resume where it left off each time without you needing to press anything.
-
-
When installation completes, the familiar Welcome screen will appear and will guide the rest of the setup.
-
It is advisable to perform the following steps during the Welcome process:
-
if using Ethernet use the Red port and have this plugged in before you enter the setup.
-
Enter WiFi password and login to WiFi network
-
Enable Location Services
-
Create user account and set password
-
Sign in to iCloud and App Store
-
Enable Siri (if you plan to use it)
-
-
Use Hackintool to mount the EFI of your new “Big Sur” disk then drag the EFI folder from your USB stick to the EFI volume of “Big Sur” and replace it.
Shut down the computer, remove the USB stick and you should now be able to boot from your computer.
I hope this gives you an easier time if you're embarking on this quest, just send me a message if you have any questions.
Happy geeking!

Overclocking
Download the Intel Power Gadget - This will let you monitor your clock speed and temperature
Change the following in the bios settings:
Favourites/CPU clock Ratio - 52
Favourites/Ring Ratio - 45
Favourites/Extreme Memory Profiler(X.M.P) - Profile 1
Favourites/CPU Vcore Loadline calibration - Turbo
Favourites/CPU Vcore - 1.310V
Tweaker/CPU Voltage Mode - Fixed VCore
Advanced CPU Settings/Intel(R) Speed Shift Technology - Disabled
Advanced CPU Settings/CPU EIST Function - Disabled
Advanced CPU Settings/Energy Efficient Turbo - Disabled
Advanced CPU Settings/Intel(R) Turbo Boost Technology - Disabled
This guide contains Amazon affiliate links
Check out the next video